Category: D365 & X++

  • How to skip ‘Next’ in a CoC Method in X++ (For Emergencies Only!)

    How to skip ‘Next’ in a CoC Method in X++ (For Emergencies Only!)

    If All Hope Is Lost! Warning: Dirty Code – A Shower Is Strongly Advised After Use! Please Don’t Do This. This Should Only Be The Last Solution!

    Skipping next in a Chain of Command (COC) method in X++ is generally not recommended, but there are a few extreme cases where it might be necessary:

    1. Full Override of Behavior – When you need to completely replace the base method’s functionality and executing next would cause unwanted side effects.
    2. Bug Workarounds – If a base method has a bug and you cannot modify it directly, skipping next can serve as a temporary fix.
    3. Security or Compliance Reasons – When the base method exposes sensitive data or violates business rules, and you must prevent its execution.
    4. Performance Optimization – If the base method is too slow and unnecessary for a specific scenario, skipping it could improve performance.
    5. Preventing Undesirable Side Effects – When next triggers unwanted behavior like double processing, duplicate entries, or conflicts.
    6. Emergency Fixes – In critical situations where there’s no time to modify the original method safely, skipping next might be a last resort.

    Even in these cases, skipping next should be carefully considered, documented, and ideally, replaced with a cleaner solution as soon as possible.

    How to do it? Here is an example code:

    [ExtensionOf(tableStr(CustTable))]
    internal final class CustTableFLX_Table_Extension
    {
        /// <summary>
        /// Coc of validateWrite()
        /// </summary>
        /// <returns>
        ///    true if the record is valid; otherwise, false.
        /// </returns>
        boolean validateWrite()
        {
            try
            {
                if (!this.RecId)
                {
                    throw Exception::UpdateConflict; //Throw exception
                    // Beware! When an exception strikes within a ttsBegin-ttsCommit transaction block,  
                    // it becomes untouchable—no catch statement inside the block can stop it,  
                    // unless it takes the form of an UpdateConflict or a DuplicateKeyException.  
                    // To ensure our catch block stands a chance, we wield the power of the UpdateConflict exception! 
                }
                else
                {
                    this.doInsert(); //<-- Please don't do this if not necessary, this is just an example
                    return true;
                }
            }
            catch (Exception::UpdateConflict) //Catch exception for calling validate write
            {
                return next validateWrite();
            }
        }
    }


    Reminder: This is just an example how to use it. Don’t skip validateWrite if not necessary.

  • Free Access to D365FO Dev Environment (with Dev Box!) – For Training Purposes Only.

    Free Access to D365FO Dev Environment (with Dev Box!) – For Training Purposes Only.

    Hello there, fellow dynamics developers!

    Ever wanted a free dev environment to play around with Dynamics 365 Finance and Operations (D365FO) for training or development? Well, guess what? I’ve got you covered! Here’s a quick guide to accessing your very own D365FO environment with Visual Studio.

    Step 1: Get Started with Microsoft Learn

    First, head on over to Microsoft Learn (Click Me). If you’re already signed in, you’ll see a button that says “Launch VM Mode”.

    If you’re not logged in yet, don’t worry, just click on “Sign in to Learn”.

    P.S. You can either use your organization account or create a new one just for this purpose.

    Step 2: Time to Log in to the VM

    Once you’ve clicked on “Launch VM Mode”, you’re almost there! You don’t have to type in any passwords.

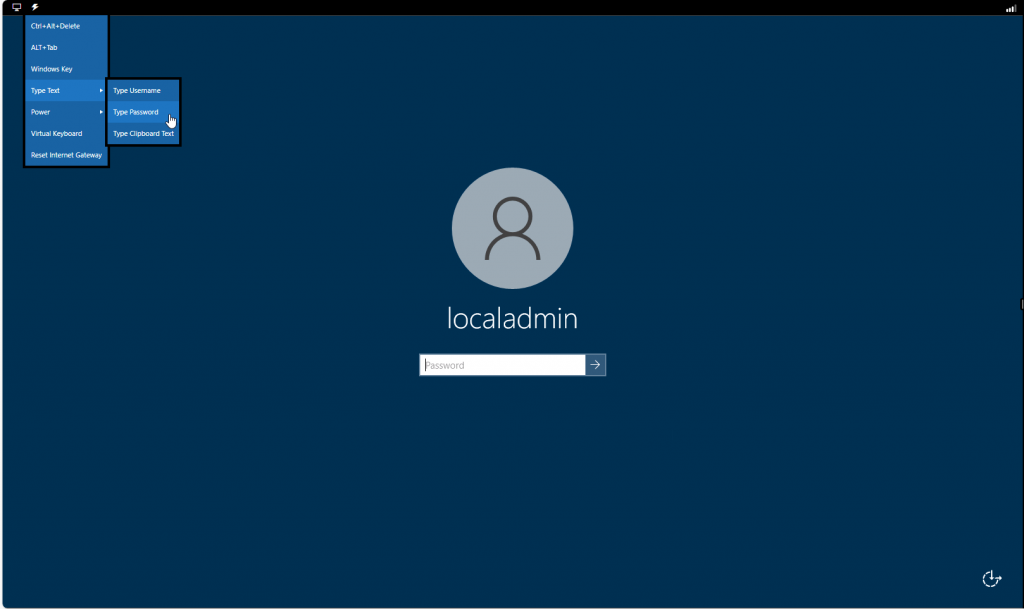
    You just need to click on the little icon navigate to “Type Text” and click “Type Password”, and voila – the system will automatically fill in the password for you.

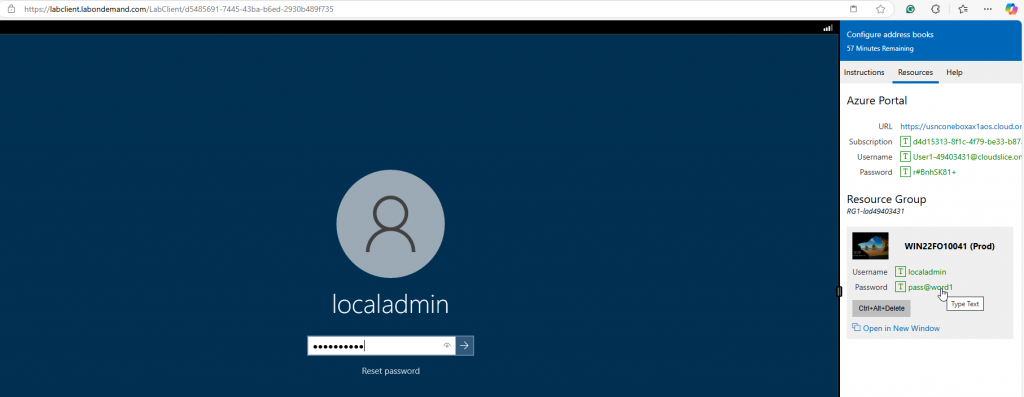
    Or you could also autofill the password from Ressources – which may be faster:

    Step 3: Ready, Set, Go!

    After clicking Enter, you’ll be inside the VM in no time!

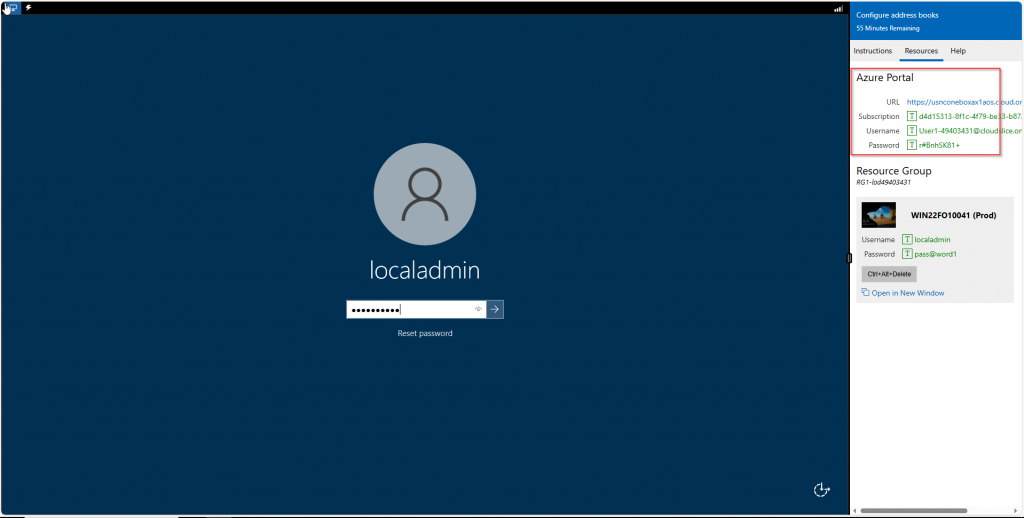
    To connect to the D365 enviroment you also need to use the url and user generated for you in the Azure Portal section of ressources.

    Step 4: Sessions and Time Limits

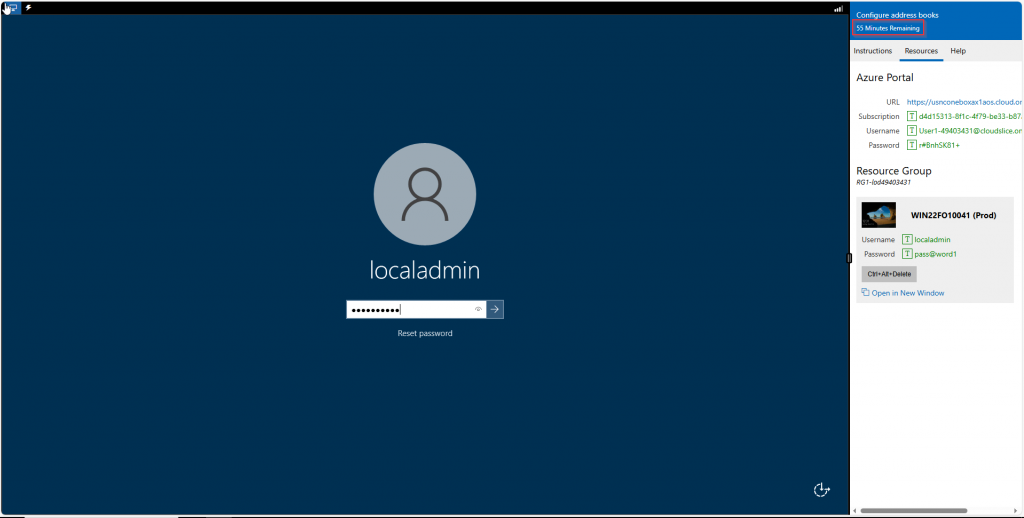
    Your session will last for up to 1.5 hours, after which it will automatically close. You can see the remaining time on the top right corner.

    There’s no limit to the number of sessions you can connect to in a day. So go ahead and explore as much as you want!

    That’s it! You now have access to a free dev environment for all your D365FO needs. Happy developing, and don’t forget to have some fun along the way!

  • X++ in D365 Finance and Operations: Manual prices in SalesLine/PurchLine records

    X++ in D365 Finance and Operations: Manual prices in SalesLine/PurchLine records

    To create your SalesLine/PurchLine record with manual price related fields there is a simple method to do this. You need to call the function setPriceDiscChangePolicy().

    See the SalesLine code example below:

    static void createSalesLine(){
    SalesLine salesLine;
    
    salesLine.salesId = "ThisIsSalesID";
    salesLine.ItemId = "ThisIsAnItemId";
    salesLine.SalesQty = 4;
    salesLine.SalesPrice = 4.89;
    salesLine.LineDisc = 5.00;
    salesLine.LinePercent = 2.00;
    salesLine.PriceUnit = 1.00;
    
    salesLine.setPriceDiscChangePolicy(PriceDiscSystemSource::ManualEntry, fieldNum(salesLine, SalesPrice));
    salesLine.setPriceDiscChangePolicy(PriceDiscSystemSource::ManualEntry, fieldNum(salesLine, LineDisc));
    salesLine.setPriceDiscChangePolicy(PriceDiscSystemSource::ManualEntry, fieldNum(salesLine, LinePercent));
    salesLine.setPriceDiscChangePolicy(PriceDiscSystemSource::ManualEntry, fieldNum(salesLine, PriceUnit));
    
    salesLine.createLine(true, //Validate
    true); //initFromSalesTable
    }

    Manually setting the fields means that any changes made on the form will not update the values automatically.

    I hope this helps in programming your task. Happy coding!

  • X++ in D365 Finance and Operations: Find prices the easy way

    X++ in D365 Finance and Operations: Find prices the easy way

    In X++, finding prices is made simple with a user-friendly function provided as a standard feature. This function streamlines the process, making it efficient and straightforward for developers to access and utilize pricing information within their code. See the example below how to search a price:

        public static Amount getPrice(ModuleInventPurchSales _module,
                                                CustTable              _custTable,
                                                InventTable            _inventTable,
                                                InventDim              _inventDim,
                                                TransDate              _date,
                                                Qty                    _qty)
        {
            PriceDiscParameters priceDiscParameters = PriceDiscParameters::construct();
            priceDiscParameters.parmModuleType(_module);
            priceDiscParameters.parmItemId(_inventTable.ItemId);
            priceDiscParameters.parmInventDim(_inventDim);
            priceDiscParameters.parmUnitId(_inventTable.salesUnitId());
            priceDiscParameters.parmPriceDiscDate(_date);
            priceDiscParameters.parmQty(_qty);
            priceDiscParameters.parmAccountNum(_custTable.AccountNum);
            priceDiscParameters.parmCurrencyCode(_custTable.Currency);
    
            PriceDisc priceDisc = PriceDisc::newFromPriceDiscParameters(priceDiscParameters);
    
            priceDisc.findPrice(_custTable.PriceGroup);
    
            priceDisc.findLineDisc(_inventTable.salesLineDisc(), _custTable.LineDisc);
    
            real price   = priceDisc.price(); //Returns price
            real discPct = priceDisc.lineDiscPct(); //Returns discount in percent
            real discAmt = priceDisc.lineDiscAmount(); //Returns discount amount
    
            return price;
        }

    I hope this helps you for your development task. Happy coding!

  • X++ in D365 Finance and Operations: Observer and display methods

    X++ in D365 Finance and Operations: Observer and display methods

    If you find yourself needing to trigger an independent display method within a form class upon the occurrence of a variable change, data source modification or event, employing the X++ observer can be of help.

    There are three distinct methods to utilize the X++ observer:

    One approach is to employ the observe() method of a datasource object. With this method, whenever a change occurs within a datasource, any associated code encompassing the <datasource>.observe() call will be executed.

    //Example 1 – FormDataSource observe
    [ExtensionOf(formStr(SimpleForm))]
    final class SimpleForm_Form_Extension
    {
        public display boolean displayCallMyMethodByFormDataSourceObserver()
        {
            myFormDataSource_ds.observe();   //Called FormDataSource observer()
            return isThisHelpful();
        }
    }

    You can define a variable with the [FormObservable] attribute. Whenever this variable undergoes a change, the corresponding code that utilizes it will be executed.

    //Example 2 – FormObservable attribute
    [ExtensionOf(formStr(SimpleForm))]
    final class SimpleForm_Form_Extension
    {
        [FormObservable]
        private int counter;
    
        public void someMethod();
        {
            //Code ...
            counter = 0; //<--- Changing variable with FormObservable attribute
            //Code ...
    
        }
        public display int displayCounter()
        {
            return counter; //Called because of FormObservable attribute
        }
    }

    Another option is to utilize the FormObservableLink class for creating a FormObservableLink object. With the markChanged() method, you can initiate a change, and by employing observe(), you can capture the change event.

    //Example 3 – FormObservableLink calls
    [ExtensionOf(formStr(SimpleForm))]
    final class SimpleForm_Form_Extension
    {
        private int counter = 0;
    
        FormObservableLink fOL = new FormObservableLink(); //1.  Create a instance of FormObservableLink
    
        public void someMethod();
        {
            //Code ...
            counter = 0;
            fOL.markChanged(); //2. Call change somwhere
            //Code ...
    
        }
        public display int displayCounter()
        {
            fOL.observe(); //3. Called through markChanged();
            return counter; 
        }
    }

    May this aid you in your continued journey within the realm of Microsoft D365 F&O development.

    Another useful posts about this topic:
    Blog on Microsoft Dynamics AX/ D365: Observer x++ D365FO (sangeethwiki.blogspot.com)
    FormObservableLink works in data source extensions – Goshoom.NET Dev Blog